HowTo:Use a spork

|
HowTo This article is part of Uncyclopedia's HowTo series. See more HowTos |
“Ah, the combination of the world's two most dangerous objects, time and money.”
The spork is the bane of all the plastic cutlery implements,but you can become a spork zen master in just five years! You could become a higher class user of this implement. Never be embarrassed again when a spork is handed to you to eat your salad with.
The spoon and the fork were cross-bred by the US Army during the occupation of Japan after the war. Gen Mc Arthur (who wanted Truman to enthrone him as emperor of Japan) decreed that the use of chopsticks was uncivilized, and the conquered foe should use forks and spoons like the rest of the 'civilized' world. Fearing that the Japanese might rise up and retake their country with their forks, he and the us army invented the spork, which was then introduced into the public schools. The army, which had taken over all government enterprises and the schools, enforced the use of the spork, and made the use of chopsticks in the schools as a punishable offence. Nowadays the spork is a common hand-out at take-away and fast food restaurants.
Getting to Know Your Spork[edit]
If you cannot afford a real spork you could try breeding your own, see below for breeding help.
The spork was born when the Spoon and Fork had a special cuddle as grown up cutlery who love each other very much do. What was born from it was an oddity, you can become the master of this oddity. first of all you have to know your spork.
A spork is a Spoon with the points of a fork on the end. Get to know your spork well, having a second nature with your spork helps you to use your spork with a smooth style.
Spork Anatomy[edit]
It is wise to practice using a spork at home first. Using a spork badly in public can be a humiliating experience. A few
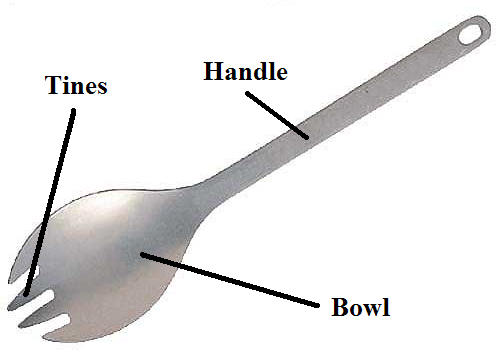
days of using a spork at home will get you used to one. Most sporks have three important parts:
The Handle[edit]
This is where you grip the spork. It is surprising how many people go wrong here at just the basics. This is one of the most vital parts of the spork because without it a spork would be useless. This part of a spork is generic to the fork and the spoon, all sporks have this part. You should hold the spork differently depending on what you are using the spork to do. There are three main ways to use a spork.
The Tines[edit]
The Prongs are the fork part of a spork. The prongs are used for lifting and prodding. The prongs are known to vary from spork to spork, longer and shorter prongs. Many cheaper sporks have blunt Tines making use of these sporks harder, however it is still possible to use these types of spork, you should only expect the best sporks. Practise with blunt sporks to get a handle of using these blunt sporks so should the situation arise you will be able to use one as though it were a normal spork.
The Bowl[edit]
The Bowl is the spoon part of the spork. The bowl holds all the other parts of a spork in place as it is in the middle, without the bowl the tines and the handle would simply float away. This is used to moving food around the plate and lifting food. The Bowl is the most effective part for lifting smaller or more fluid food. The side of the bowl is often sharp so can also be made use of.
The Techniques[edit]
There are Four Techniques to using a spork. You should learn these techniques as they are vital in the use of a spork. With practice you can become fluid in moving between these techniques.
Levering and Lifting[edit]
Be careful not to poke yourself with the tines!
This is when you wish to pick something up from the plate and put it into your mouth. To hold the spork for this technique your hand should be placed with the thumb at the top in an inverted C shape. Now place the spork on the gap between the thumb and the first finger with the Tines pointing away from you and the bowl so that it bends downwards. Support the spork with your second finger and close the thumb and first finger around the spork. Now you are gripping the spork in the correct position you are ready to do the procedure. To perform this maneuver bring the spork level with the food to be lifted, push the spork under the food, with the food in the bowl bring it up to your mouth and place it into your mouth using your lips to take it off of the spork.
Poking and Lifting[edit]
A spork is not suitable for soup as the bowl is compromised by the prongs.
This technique should only be used when dealing with more solid food. To hold the spork for this procedure touch the tip of your thumb and second finger together. Next place the spork on the point where the thumb and second finger join together with the prongs pointing away from you and the bowl bending upwards. Finally place the first finger on the back of the bowl so that the spork is firmly supported. Now you are gripping the spork in the correct position you are ready to perform this maneuver. Bring the Tines down to the food you wish to eat, push them into the food until the food is secured, then lift the spork to your face and place the food into your mouth using you teeth to take the food off of the spork. It is harder to harm yourself with the spork in this procedure as the tines are covered by food, however take care when removing the food.
Cutting[edit]
This technique should be used if the food is to large to use one of the other techniques. To hold the spork for this procedure, like the poking technique, touch the tip of your thumb and second finger together. Now place the spork in between the thumb and second finger, opening your fingers slightly to let the spork fit slot into your fingers helps. Finally again place the forefinger on the top to secure the spork in place. Now you are ready. Bring the spork down to food level and press it into the food. this will make the food smaller so it is easier to handle.
Moving Between the Positions[edit]
Now you know the positions for the above three techniques the final technique is being able to smoothly move between the techniques. This normally involves moving the fingers slightly so that the spork rolls into the correct position. This takes some skill to manage but over time it can be mastered.
Breeding sporks[edit]
For those of us out there who can't afford a spork, you could breed one of your very own. Breeding conditions are hard reproduce, some very active forks and spoons will breed together in the cutlery draw, but many require coxing. A Warm place such as a warm airing cupboard. Place a fork and a spoon together in a ice cream tub so that the spoon and fork cannot escape and leave them together for 4-5 weeks. After then you should have a small litter of 3 or 4 sporklets which will be ready to use in around 3 weeks. Sexing cutlery however is very hard and not always reliable so it may take several attempts to obtain one of each gender. Should you have any problems with breading take your cutlery down to the local home ware shop ask them to sex and age your utensils. NEVER put more than one fork together as the males are very territorial, often fighting to the death. As a result most sets have only one or two males in each set. Let your sporklets become fully grown before using them otherwise they become stunted in growth and blunt. Mass produced sporks are often blunt because they haven't been allowed to become fully grown in an attempt to save money. Spork Breeding can sometimes end up with problems, such as when the wrong part of the fork and spoon DNA enters the spork, ending up with a spoon with slots in the bowl and no tines. These offspring are useless for eating with and so are knitted together into sieves. Do not be distressed if you see these sporks.


